Category Archives: Software

DRAWL – LISP 1.5 written in PLASMA for the Apple II

Introduction

Why LISP 1.5? Didn’t that come out in the early 1960’s? Yes, as one of the earliest programming languages, LISP holds a certain place in history. Along with COBOL and FORTRAN, LISP hails from the dawn of computing and introduced many concepts still currently in use. Some unique features of the time included functional programming based on Lambda Calculus and recursion. Written as an interpreter, is was one of the first environments to use interactivity through a REPL interface: Read, Execute, Print, Loop.

As if exploring an ancient dialect of LISP from 1962 wasn’t enough, I wanted to do it using my own language, PLASMA, designed for the 6502 processor from 1975 and using it on an Apple ][ from 1977, all in 2024. I used the second edition of the LISP 1.5 manual to implement my own version of LISP 1.5, including some of the extensions to make LISP a more palatable language for the modern age (late 1960’s).

Some quick basics (no pun intended) of the language; everything is written as an S-expression. An S-expression is a simple notation that Uses parenthesis to denote a list of elements separated by spaces. Additionally, a dot notation can be used to pair elements together. Elements themselves can also be S-expressions. Since LISP is a programming language, an S-expression can represent a function to be executed by making the first element in the list the function and the remaining elements the arguments. A quick example:

(+ 1 4)

This would denote addition of two numbers, one and four, returning the value 5. Higher level functions can be defined with the LAMBDA notation:

(DEFINE (ADD1 (LAMBDA (I) (+ I 1))))

And that is where all the parentheses comes in to play. I won’t spend any more time on the actual language, there are links at the bottom for that.

A Brief History of LISP

LISP was developed by John McCarthy at the M.I.T. Artificial Intelligence Lab starting around 1957. The first widely available version was LISP 1.5 around 1962. McCarthy based LISP on the idea of Lambda Calculus proposed by Alonso Church in the early 1930’s. A simple concept of calculation involving recursion. LISP 1.5 was an interactive interpreter that could also compile into machine code while running. Pretty heady stuff in the early days of computing.

Unsurprisingly, only being able to program using recursive S-expressions was a bit limiting and not always easy. Sometimes the direct approach works better. So extensions were developed for LISP to make it a bit more like its contemporary languages such as FORTRAN and ALGOL. With the extensions, LISP becomes a little less weird and more approachable, but the parenthesis remain.

The listing in the LISP 1.5 manual didn’t help in that they didn’t use the idea of formatting and indenting to clarify levels and blocks of code. I will use formatting in my examples to improve the readability of the code.

PLASMA, the Apple II, and LISP 1.5

When deciding to do my deep-dive into understanding LISP at a fundamental level, I used the old adage: “To fully understand a language, you need to write an interpreter/compiler for it”. There aren’t any modern versions of LISP 1.5 available – they are all based on Common Lisp, Scheme, Closure, etc. and are much larger languages than I wanted to implement on my own. I also try and push my own language, PLASMA, to develop sophisticated applications, utilities, and languages. My last project involved implementing FORTH in PLASMA. It wasn’t a huge leap as I used many FORTH concepts in the development of the PLASMA byte code VM. LISP has been a much more challenging journey in that it was new territory for me.

DRAWL

As a play on LISP, DRAWL is a slow version of LISP 1.5 for the Apple II and ///. Turns out, it isn’t as slow as I expected. It’s rather interactive and capable of actual algorithm development. Some of the notable features of DRAWL: tail recursion, 32 bit integers, 80 bit floating point, arrays, printer output, lo-res graphics and garbage collection. There are many more features detailed on the GitHub site. DRAWL uses a great many features of the PLASMA environment, and as such, uses a lot of memory for itself. On a 64K Apple II, it only leaves about 7K of free memory for LISP code and objects. However, if transcendental functions are not needed, they can be skipped at startup to free up to about 12K of memory. On a 128K machine, there is about 26K of free memory, even with the transcendentals loaded. PLASMA make efficient use of memory in a 128K machine, so the added features don’t impact the memory footprint as much. DRAWL incorporates some of the later extensions to LISP 1.5 to support more ALGOL like code. The examples I’ll go over compare the two approaches.

DRAWL lacks general I/O operations, but does allow for LISP code to be loaded from a file at startup. For output, echoing to a printer provides hard copy. If running in an emulated environment, it often captures printer output to a local file and/or the clipboard making incorporating calculations into outside operating system easy.

LISP 1.5, and thus DRAWL, is really focussed on mathematical expressions. DRAWL uses 32 bit integers for extended values over most Apple II programming environments. Bit operations and hexadecimal notation make for a handy low-level calculator. Floating point support comes from the Standard Apple Numeric Environment library. It calculates using an 80 bit extended floating point format, rivaling most modern implementations. DRAWL can operate as a very sophisticated programmable calculator.

LOOP.LISP example

This example uses three different techniques to loop over a range of integers from 1 to 100 and print them out:

(DEFINE
 (TAILLOOP (LAMBDA (I M)
   (COND ((AND (< I M) (PRIN I)),
           (TAILLOOP (+ 1 I) M))
         (T,I))
 ))
 (PROGLOOP (LAMBDA (I M)
   (PROG ()
   A (PRIN I)
     (SETQ I (+ I 1))
     (IF (< I M) (GO A))
     (RETURN I)
 )))
 (FORLOOP (LAMBDA (I M)
   (FOR I I 1 (< I M) (PRIN I))
 ))
)

'TAIL
(TAILLOOP 1 100)
'PROG
(PROGLOOP 1 100)
'FOR
(FORLOOP 1 100)

The first function, TAILLOOP(), recursively calls itself with an incrementing value of I. The terminal count, M, is passed along each time so COND() can choose when to return a value instead of recursing. Note I am using AND() to call two functions in the test clause. PRINI() will pass the value printed through as it’s value. Anything other than NIL will be considered TRUE. So, if the terminal count hasn’t been reached AND PRINI() returns a value other than NIL (always in this case), the second clause will run and TAILLOOP() will be tail called with the incremented value of I. The sharp eye will notice there are commas separating the elements of the COND() test and execute clauses. The manual mentions the comma is a hold-over from the earlier version of LISP and should be treated as a space. I use it here for the visual distinction between the clauses, although unnecessary.

The second function, PROGLOOP(), employs the ALGOL-like construct PROG() to execute functions in order. Two new operations, GO() and RETURN() control the flow of the routine. GO() is a GOTO LABEL function. RETURN() simply returns from the function with a value. SETQ() will update the value of a variable with the second argument.

Lastly, the FORLOOP() runs the first argument (must be a variable) from an initial value (itself in this case), incrementing it with the third argument and testing with the fourth argument. If the test returns true, the rest of the arguments are called as functions in order, the value of the loop being that of the final function in the list.

As for performance, the TAILLOOP() and PROGLOOP() are roughly equivalent. The FORLOOP() runs significantly faster due to some index variable updates happening under the covers.
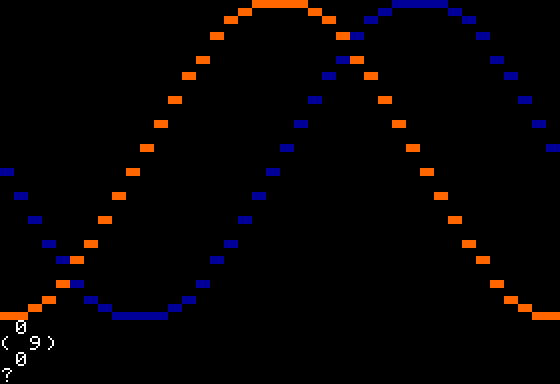
LORES.LISP

This example shows off a number of LISP and DRAWL features:

(DEFINE
 (PLOTFUNC (LAMBDA (FN)
 (PROG (I X Y)
 (FOR I 0 1 (< I 40)
   (SETQ X (/ (- I 19.5) 20.0))
   (SETQ Y (FN X))
   (AND (> Y -1.0) (< Y 1.0)
     (PLOT I (- 19.5 (* Y 20.0))))
 )
 (RETURN 0)
 )
 ))
 (PLOTSIN (LAMBDA ()
   (PLOTFUNC '(LAMBDA (S) (SIN (* S PI))))
 ))
 (PLOTCOS (LAMBDA ()
   (PLOTFUNC '(LAMBDA (S) (COS (* S PI))))
 ))
)
(GR T)
(COLOR 2)
(PLOTSIN)
(COLOR 9)
(PLOTCOS)

Here, PLOTFUNC() takes a parameter being a function to call. PLOTFUNC() steps through the 40 horizontal pixels (0 to 39), scales it into an X value going from -1.0 to 1.0, then calls the passed in function to calculate a Y value. The Y value is scaled back into the vertical pixel range of 0 to 39 and plots it. Here are a few things to note: the Y value is tested for being between -1.0 and 1.0 and PLOT(). AND() will short-circuit should it come to a FALSE clause and skip the rest of the arguments. If Y is out of range, PLOT() won’t be called. PLOTSIN() and PLOTCOS() both pass in a function by quoting it with the ‘ character (shorthand for QUOTE()). The LISP aficionado will say this should be written as:

 (PLOTSIN (LAMBDA ()
   (PLOTFUNC (FUNCTION (LAMBDA (S)
               (SIN (* S PI)))))
 ))
 (PLOTCOS (LAMBDA ()
   (PLOTFUNC (FUNCTION (LAMBDA (S)
               (COS (* S PI)))))
 ))

and they are correct. Mostly. The ‘ character, or QUOTE(), is fine in this case as the functions don’t access free variables – variables defined outside the function. In this case, QUOTE() is a smidge faster than FUNCTION().

Output:

Links

Here are links to follow up if you’re interested. The LISP 1.5 manual is particularly interesting. Much different than texts today and gets into the interpreter implementation by page 13!

LISP 1.5 Manual: https://archive.org/details/bitsavers_mitrlelisprammersManual2ed1985_9279667

LISP 1.5 Primer: https://www.softwarepreservation.org/projects/LISP/book/Weismann_LISP1.5_Primer_1967.pdf

P-LISP Manual (newer than LISP 1.5): https://archive.org/details/gLISP/gnosisLISPManual

Apple Numerics Manual (SANE): https://vintageapple.org/inside_o/pdf/Apple_Numerics_Manual_Second_Edition_1988.pdf

Part 1 of DRAWL in action: https://youtu.be/wBMivg6xfSg

Part 2 of DRAWL in action: https://youtu.be/MdKZIrfPN7s

GitHub DRAWL documentation: https://github.com/dschmenk/PLASMA/blob/master/doc/DRAWL.md

Preconfigured PLASMA ProDOS boot floppy for DRAWL: https://github.com/dschmenk/PLASMA/blob/master/images/apple/DRAWL.po

TFTP Server for Apple II

While working on the PLASMA 2.0 development branch, it occurred to me that copying files by floppy was just too retro. Since I have both an Uthernet and Uthernet II card, it made sense to use these for file transfers. As many know, ADTPro has fantastic support for file copying using the Uthernet cards. However, as I have a nice network stack under PLASMA for these cards, I decided to build an industry-standard file transfer program. The Trivial File Transfer Protocol fits the bill perfectly. I wrote the TFTP server and ported it back to the stable branch of PLASMA Version 1.1 (the server found a bug with the PLASMA 2.0 network module loading I’m still working out). You can download the bootable PLASMA System floppy from GitHub:PLASMA-SYS1.PO

Simply boot the floppy in your Apple II with Uthernet I or Uthernet II card installed. Once booted, you should see the PLASMA startup message. To run the TFTP server, type:

+tftpd

The disk will spin as the modules are loaded and the network card should be auto-detected. The IP address will be fetched from a DHCP server and the Apple II will be ready to transfer files. The Apple II will display its IP address which you will need later with the TFTP client.

On your modern computer, you will need to install a TFTP client.

Windows 10: You already have a TFTP client, it just has to be enabled. Go to” Control Panel=>Programs=>Turn features on or off” and scroll down to TFTP Client. Enable it by clicking in its box.

MacOS: A tftp client is included with MacOS, accessible from the command line. It doesn’t have the extended command line options that atftp has, though.

Linux: I have used Advanced TFTP (atftp) with good results. You can install with your Linux package manager of choice.

I will use atftp under Linux for my examples as I was using A2Pi for my development machine. The TFTPD server on the Apple II will use the CiderPress ProDOS filename metadata extension so you can set the ProDOS TYPE and AUX values with standard clients. If you set your TFTP client to ‘netascii’ mode, TFTPD will do the conversion of linefeed to carriage-return and vice-versa when copying text files. This only works for MacOS and Linux, Windows uses both carriage-return and newline which doesn’t convert easily.

Copying a file from Linux to Apple II using the command line:

atftp 192.168.123.108 --put -l plasma.system -r /CFFA/PLASMA.SYSTEM#FF2000

Let’s break this down: The IP address is the address displayed by the Apple II when it started TFTP. The –put option tells atftp that we are sending a file to the server. The ‘-l plasma.system’ gives the local name of the file and the ‘-r /CFFA/PLASMA.SYSTEM#FF2000’ gives the remote file name. Note that we specify the full pathname. It could have been relative to where we started TFTPD on the Apple II, but I like being explicit. Also note the CiderPress meta-data extension to the filename. This will be translated into the ProDOS TYPE and AUX values for the file and removed from the filename on the disk.

Copying a text file from Apple II to Linux:

atftp 192.168.123.108 --option "mode netascii" --get -l read.me -r /CFFA/README

Here we are copying a text file and converting the line endings to match Linux/MacOS. the ‘–option “mode netascii”‘ sets the text mode translation. The default is ‘octet’ which does no translation.

So, there are some issues with copying text files this way. It turns out that setting ASCII mode for transfers sends end-of-line as a CR/LF sequence. Our Apple II only wants CR, making a real mess of text files. Instead, I decided to use the ProDOS file TYPE value to determine when to translate LF to CR and back. Transfer text file to the Apple II with:

atftp 192.168.123.108 --put -l read.me -r /CFFA/READ.ME#040000

By using the CiderPress meta-data to set the ProDOS TXT type (the 04 part of #040000), TFTPD will do the translation. Getting text files from the Apple will automatically translate the line endings back to LF:

atftp 192.168.123.108 --get -l read.me -r /CFFA/README


Note that neither sets the ASCII mode.

One of the difficulties with TFTP is the inability to do a directory listing. You can’t fetch a list of files from the server, so you will have to know the filenames a-priori. If you do a lot of copying of the same files, it is very handy to create a batch-type file to automate the copies.


Enjoy!

Apple II + Arduino + SD Card + SdFat = A2SdFat!

Doing Something Useful

After building the basic framework for interfacing the Apple II to an Arduino over the game port, something useful had to be created with it. I had an Ethernet Shield lying around that also happens to have an SD card slot.

Arduino with Ethernet and Proto Shields

Arduino with Ethernet and Proto Shields

There are already plenty of Ethernet products available for the Apple II, but few SD card options for transferring individual files. FloppyEmu, from Big-Mess-O-Wires is a great product and I highly recommend it, but for my project I wanted something closer to a hardware version of CiderPress: the Apple disk image utility.

I’ve worked on a similar project with Rodney Ross to bring the Apple II Pi’s virtual disk interface to the Super Serial Card using an Atmel processor and the SdFat library. I thought I would take the same basic framework but create a different use: interact directly with the  FAT filesystem on the SD card by way of the SdFat library. This wouldn’t be a virtual drive (that would be easy enough to implement), but a direct interface to the FAT filesystem on an SD card. Also, many new laptops come with an SD card reader built in, so it makes for a great way to sneaker-net files back and forth. Both individual files and floppy disk image files can be read and written to Apple connected storage. ProDOS hard disks, CFFAs, and such can copy files using the CiderPress file naming convention to retain the ProDOS meta information. Floppy disk images can be read and written directly to physical floppy drives. The challenge is to make the data transfer over the game port fast enough to support copying large files back and forth. Sound good? Want to build one yourself? Read on…

The Hardware

One of the goals when creating this project was to use easy-to-obtain parts so that anyone with a little time could replicate the hardware and software themselves.  The parts list is nice and short:

  1. 1 Arduino Uno
  2. 1 Logger Shield or Ethernet Shield + Proto Shield
  3. 16 wire Ribbon Cable
  4. 2 IDC 16 pin DIP Plugs (for both ends of the ribbon cable)
  5. 1 16 pin DIP Socket
  6. 6 Wires
  7. Optional – 1 SPDT PCB Slide Switch (II & IIGS functionality)

Along with a soldering iron and some solder, you will be good to go. You can see my build using the Proto Shield on my previous post. One modification I made was for the Apple IIgs, which lacks the $C040 Strobe signal, was to connect the AN2 pin as the SCLK signal. I used the slide switch to select between the $C040 Strobe and AN2 going to the Arduino’s Digital Pin 6. Using AN2 for the SCLK is slower than the $C040 Strobe, but the only option on the IIgs. Here is the pin connections I use:

 Apple II        Signal         Arduino
 --------        ------         -------
   AN0            MOSI        Digital Pin 8
   AN1             SS         Digital Pin 3
   PB0            MISO        Digital Pin 7

Apple II/IIe     Signal         Arduino
------------     ------         -------
 C040 Strobe      SCK         Digital Pin 6  

Apple IIgs       Signal         Arduino
----------       ------         -------
    AN2           SCK         Digital Pin 6

Apple II game port diagram is available from:

http://www.1000bit.it/support/manuali/apple/R023PINOUTS.TXT

Arduino Uno pin diagram is available from:

http://www.gammon.com.au/forum/?id=11473

The Firmware

Once the hardware is connected (built seems a little extreme), the software to give the Arduino its purpose needs to be programmed. Three items need to be installed on your computer (modern, not retro):

  1. Arduino IDE
  2. SdFat Library
  3. AppleSlave Project
  4. RTC Library (optional)

The Arduino IDE will create a working directory for your projects. Inside this directory, you should create a sub-directory called AppleSlave and place the AppleSlave.ino file there. From the SdFat download, move the SdFat/SdFat/ directory into the libraries/ directory in your working Arduino directory. You should be able to load the AppleSlave.ino project into the Arduino IDE and build it, bringing in the SdFat library. Depending on which Arduino shield you are using for the SD card interface, you may need to edit the AppleSlave source. Near the top, you will find a line that looks like:

const int sdSSpin = 4;

This is the default when using the Ethernet Shield. If you have the Logger Shield, this line should be changed to use 10 instead of 4. If all is in the proper location, you should be able to plug the Arduino into the computer with a USB cable, and build/upload.

The current firmware is still a work in process. There are a few more functions to implement, but it is enough to support the software below.

The Software

There are currently five basic utilities to interact with the files on an SD card.

  • FATCAT – display catalog of SD card
  • FATGET – get a file from the SD card
  • FATPUT – put a file onto the SD card
  • FATWRITEDSK – write an image on the SD card to floppy
  • FATREADDSK – read a floppy to an image on the SD card

These programs are written in PLASMA, a mid-level programming language developed for writing new applications using modern syntax and efficient execution. You can download a disk image, SDFAT.PO, containing a bootable ProDOS floppy with these programs on it, ready to go. Now you have a chicken and egg problem: getting the image written to an actual floppy will require a program like ADTPro (or maybe a friend can create a floppy for you).

Using A2SdFat

Using the utilities involves the PLASMA command line interface. It is a very simplified environment, but not hard to use. You can get a ProDOS catalog by entering ‘C’ and return. To run one of the A2SdFat program, use a ‘+’ to signify it is a PLASMA module, as in:

+FATCAT

The other commands take additional parameters. You will get a quick synopsis by just typing the command. But, they are:

+FATCAT [directory]
+FATGET <FAT filename in CiderPress format>
+FATPUT <ProDOS filename>
+FATWRITEIMAGE <FAT filename> [drive (1*, 2)]
+FATREADIMAGE <FAT filename> [drive (1*, 2)]
* = default value

That should be all you need to get lots of floppy disk images read and written, as well as copying ProDOS files around. Hopefully, more utilities will be written to provide menu driven and batch mode copy operations, but this is enough to get going.

As a quick follow-up, I’ve received the cheap Chinese order from BangGood of the GeekCreit Uno and Data Logger Shield. Not nearly the quality of the original, but the price is right. Three knock-off Unos and Data Logger Shields cost less than one original Arduino Uno. The Data Logger Shield is a nice shield that has a full size SD card port and a Real Time Clock chip. Here it is being built up with a socket for the game port cable:

IMG_2337

IMG_2335

IMG_2338

IMG_2339


The Arduino/AppleSlave project has been updated to use the SlaveSelect pin on pin 10 and add the RTCLib from AdaFruit.

Also, note that you will need to download a USB serial port driver to use the Arduino IDE under Windows or OS X. So not quite plug and play.  I’ve created a quick video showing off the new parts:

Feel free to leave feedback on the PLASMA GitHub site, or drop me a line.

Enjoy!

Apple II, meet Arduino

Having received a package in the mail last week containing Andrew and Ivan Hogan’s GamePort I/O Board, it got my creative juices flowing. The GamePort I/O Board is a great interface to big, external devices. It’s meant to control things like electronic sprinkler heads, relays, that sort of thing. I wrote a PLASMA sketch to simplify the game port interface, and generally had fun with it. But, as I sat there looking at the game port specification in the Apple II Reference Manual, I noted a utility strobe signal that would produce a 1/2 micro-second pulse when referenced. Hmm. In years past, I had tried building an SPI (Serial Interface Bus) connection using a 6522 and external shift register so I could adapt an Arduino Ethernet Shield to the Apple II. It almost worked, but not quite. And not too long ago, Charles Mangin of Option8 fame had brought up for discussion a method of talking to an Arduino over the Apple II’s game port, and a KansasFest presentation to match. All of this must have sunk into my sub conscience, because I actually had a dream about how to bit-bang an SPI interface from the Apple II to an Arduino over the game port.

Why SPI? Well, it is a nicely defined protocol that has some interesting properties. More information can be found on WikiPedia, but it boils down to having a master talking to a slave in a synchronous manner. Data travels both ways: a bit is read as one is written. So you read and write at the same time. Not all data need be relevant, however. SPI doesn’t define a high-level protocol, just a transfer mechanism.  And it only requires 4 wires: SlaveSelect, Clock, MasterOut/SlaveIn, and MasterIn/SlaveOut.

The Apple II game port isn’t the greatest interface for implementing a fast bit-banged protocol, but it isn’t too bad, either. The master is responsible for the clock, which is where that utility strobe comes in. Along with the strobe, it has 4 general purpose digital outputs and 3 general purpose digital inputs. Programming the outputs is a little strange, and somewhat time consuming on a 6502 if you want to scan out a series of bits. For SPI, only two outputs are needed and one input, if the strobe is used as the clock. This is where the strobe signal really helps out with the bit-banging approach. The clock signal doesn’t have to be symmetrical, the slave just wants to see the edges, and it doesn’t have to adhere to a consistent rate (although I assume most hardware implementations are). So that takes care of the Apple II side of things. What about the Arduino?

SPI on the Arduino is officially only supported in master mode. If I was going to bit-bang the interface on the Apple II, why not the Arduino. One of my goals was to leave the hardware SPI interface on the Arduino intact so I could use the Arduino as a proxy for the Apple II when talking to the myriad of Arduino shields out there – many of which talk SPI. On top of that, there are some nice libraries that implement higher level interfaces such as TCP/IP and FAT file systems. Now the Arduino Uno (well, the ATmega 328P) has some nice features for interfacing to all sorts of things, and the Arduino IDE is a great prototyping environment, so it did’t take long to whip up a connection between the Apple II game port and the digital pins on the Uno. It did take a few iterations to identify the best way to interrupt the 328P when the Apple II was initiating a transaction. Software polling was going to be slow, and potentially miss the quick clock pulses. So I connected the clock signal to an interrupt to make sure I didn’t miss any. However, there was enough potential jitter in servicing the interrupt that bits could get lost. So I ended up interrupting on the assertion of SlaveSelect, and went into a tight loop watching the clock signal and updating the shift registers. Because of the tight constraints during data transmission, I skipped the Wiring library and went straight to the I/O ports on the 328P. By choosing my pins wisely, it made the software particularly simple to shift data in and out over the wires.

Testing out the wiring options was made easier by using a breadboard to connect the game port to the Arduino’s header.

Breadboard ConnectionSwitching the pins around was a matter of moving the wire.

Finally, I came to a conclusion as to the best wiring connections:

 Apple II        Signal         Arduino
 --------        ------         -------
   AN0            MOSI        Digital Pin 8
C040 Strobe       SCK         Digital Pin 6  
   AN1             SS         Digital Pin 3
   PB0            MISO        Digital Pin 7

Once I was satisfied the interface was solid, I soldered up my one and only Arduino Proto Shield, which was waiting for just the perfect project to commit to.

IMG_2322I soldered the wires to the back to keep it nice and clean.

IMG_2325The game port does have a 5V supply, but it is very limited in current: 100mA. A base Arduino without much load should be able to keep under that requirement, but when connected to a host PC for programming, I didn’t want my 5V supplies fighting each other, so I added a jumper for the game port’s 5V.  The Arduino site says this isn’t recommended. Yeah, whatever.  Finally, it all came together and I ran my test program on it.

IMG_2323The LED lights up whenever a key is pressed on the keyboard that has the LSB set, or turns the LED off when it doesn’t. The Arduino’s on-board LED was somewhat covered up by the Proto Shield, so I plugged another one right into the header so you could see it. You can find the Arduino sketch and the PLASMA sketch on GitHub.

Going forward, I would like to leverage the FAT filesystem library for SD cards so I can read and write files to and from the Apple II directly from the card. That will greatly simplify my file transfer workflow.


Apple II Super Serial Card w/ EEPROM

SSC-EEPROM


When Apple designed the Super Serial Card back in 1981, they made it compatible with SRAM chips, replacing the ROM it shipped with. Modern EEPROM look just like SRAM chips, with a longer write cycle, so I popped one in, added a write-protect switch, and off I go to debug the Apple II Pi PiDrive ROM code.

SIDrive

Rodney’s H/W arrived and it fired right up. Made some firmware updates, optimized the sketch, and we have a reasonable perky SDCard storage for the Apple II. I re-christened PiDrive to SiDrive: Serial Interface Drive.


Kevin Dady’s website that Rodney based his design on: http://osgeld.a2hq.com

What is the Apple II Pi?

Basically, the Apple II Pi is the integration of an Apple II with a Raspberry Pi (http://www.raspberrypi.org) to create a hybrid computer combining the input devices and storage mediums of the Apple with the CPU, GPU (graphical processing unit), USB, and network capabilities of the Broadcom BCM2835 SoC (think smartphone processor).  The concept is to create an updated version of the Apple II using some imagination, low-level drivers, off-the-shelf hardware, and a closely coupled communications channel; thus bringing semi-modern hardware and 32 bit *nix software to the Apple II platform.  The Apple II is running as a dedicated I/O processor for the Raspberry Pi under ProDOS.  The Raspberry Pi is running a version of Debian Linux: Raspbian.  Much like the PC Transporter card brought MS-DOS and the Z-80 card brought CP/M, the Apple II Pi brings Linux to the Apple II using the Apple’s input devices and the Raspberry Pi’s video output.  As such, knowledge and familiarity with Linux is required to get the most out of its environment.  Under Linux, the Apple II Pi can read and write the Apple’s storage devices (floppies/harddrives/CFFA) and also run the GSport Apple IIgs emulator (http://gsport.sourceforge.net).  Together, GSport and Apple II Pi provide an immersive environment providing access to most of the Apple II hardware you own plus an accelerated ~20MHz 65816 with up to 8 MB RAM, and all the disk images you can fit on the SD card.

Videos of Apple II Pi development

Videos of Apple II Pi in action

Download the User Manual

FAQ

What additional parts are needed to use the Apple II Pi adapter card?

Aside from a functional Apple II (64K with 5¼ floppy drive connected to slot 6), you need a Raspberry Pi with an installed OS on its SD card.  To attach a DVI or HDMI monitor/TV to the Raspberry Pi, an HDMI angle adapter is needed to redirect the downward facing HDMI port once the Raspberry Pi is attached to the Apple II Pi adapter card.  Depending on which slot the Apple II Pi will be plugged in to, a 90 or 270 degree adapter will be needed.  An HDMI or HDMI->DVI cable long enough to exit the Apple II case and attach to the monitor/TV is also required.  If you don’t have an Apple II mouse, a USB mouse will be required for running the X Window GUI environment.

Is a power supply needed with the Apple II Pi adapter card?

No.  The Raspberry Pi gets power from the Apple II through the adapter card’s header connection.

Is the Raspberry Pi talking directly to the Apple II peripherals?

No, the Apple II is running a custom driver that reads input from the keyboard and mouse, then sends these events over a high speed serial connection to a custom driver on the Raspberry Pi that injects them into the Linux input subsystem.  The Apple II keyboard and mouse look just like any other keyboard and mouse to the Raspberry Pi.  The Apple II joystick and storage devices are made available to Linux with additional drivers that run code on the Apple II using a special Apple II Pi protocol.

Additional information:  There was talk about interfacing the Raspberry Pi directly to the Apple II bus when this concept was originally posed on comp.sys.apple2.  However, after reviewing the I/O pins on the Raspberry Pi and the real-time software challenges of this approach, the decision to interface the two computers using a high-speed serial interface with a custom protocol and client/server drivers was made.  This method also allows the Apple IIc and Apple IIe with a Super Serial Card to use the Apple II Pi software without modification.  This is, in fact, how the software was developed before and after the Apple II Pi interface adapter was built.

Do I have to use the Apple II keyboard and mouse?

No, the Raspberry Pi has USB ports (one on the Model A, two on the Model B) that can be used to plug in modern keyboards and mice.  Additional devices can be plugged in using a compatible USB hub.  They can be used in parallel with the Apple II keyboard and mouse.  If you don’t have an Apple II mouse, just plug in a USB mouse, and it will work fine.

What monitor do I use with the Apple II Pi?

Here you have some options: the default would be to use the HDMI output of the Raspberry Pi to plug into a DVI or HDMI monitor/TV.  The composite port of the Raspberry Pi was compromised to allow clearance for the HDMI port.  With a hacked up video cable and a soldering iron, you can connect the composite video cable directly to the Raspberry Pi board and plug into a composite monitor.  In some cases, it can be useful to have a composite monitor plugged into the Apple II output for running the Apple II Pi configuration program or for developers who want to run code directly on the Apple II (and see it’s output).

Is the Apple II Pi interface adapter required to run the Apple II Pi software?

No, the Apple II Pi software uses the Super Serial Card’s 6551 chip in a special, high-speed mode.  The Apple II Pi adapter card simply has a Raspberry Pi header for connecting the Raspberry Pi to provide the serial port interface and power.  To the Apple II software, the Apple II Pi interface adapter looks like a firmware-less Super Serial Card.  An Apple IIc with a functional serial connection between itself and the Raspberry Pi will work with the Apple II Pi software just fine; some additional parameters may need to be set in the client and/or server software.

Is the Apple II Pi Open Source?

Yes, all the code is available here: http://github.com/dschmenk/apple2pi

Does the Apple II Pi just accelerate the Apple II?

Not in the way a traditional Apple II accelerator would.  Because the Raspberry Pi is always running Linux, some configuration has to be made to give the illusion of being an Apple II accelerator through the GSport emulator.  But its strength is in bringing modern CPU+GPU hardware and a modern 32 bit OS (Debian Linux) to the Apple II platform.

Does the Raspberry Pi provide any services to the Apple II?

Update: New functionality has been added to the software that give the Apple II additions ProDOS drives through the PiDrive interface to the Linux daemon.  Once a connection has been established between the Apple II and Linux, the Apple II client can exit back to ProDOS and still have the addition virtual PiDrives available for reading & writing. The virtual drive images can be changed from Linux.

No, the Apple II is slaved to the Raspberry Pi as a dedicated I/O processor.  The Raspberry Pi’s network connection, memory, storage, etc. are not made available to the physical Apple II.  However, the GSport emulator can make use of the Raspberry Pi’s memory and speed, as well as many peripherals attached to the physical Apple II.  Any USB devices won’t be seen by the physical Apple II, but can be used by the GSport emulator.

Does the Apple II provide any services to the Raspberry Pi?

Yes, the Apple II is slaved to the the Raspberry Pi as a dedicated I/O processor.  Besides the keyboard and mouse input, the Apple II Pi uses a custom protocol that allows Linux applications and drivers to access the Apple II memory and execute arbitrary code on the Apple II.  This flexible protocol is how the Linux joystick driver was written and how the FUSE (File system in User SpacE) driver provides ProDOS volumes as Linux directories and files.  Additionally, some of the provided tools that come along with Apple II Pi allow interacting with AppleSoft BASIC running on the physical Apple II and running arbitrary 6502 binaries on the Apple II.

Do I have to learn Linux to use the Apple II Pi?

Depending on how your Apple II Pi is configured and how you plan on using it: maybe.   Because the Apple II Pi is always running Linux, you will have to interact with it at some level.  If your setup is configured to automatically run GSport and then shutdown, there isn’t much you have to learn except logging in.  However, the strength of the Apple II Pi lies in the fact it is running Linux, an industrial strength, modern operating system.  To use the full capabilities of the Apple II Pi requires interacting with Linux and the X Window System.  There are a large number of quality and free applications available for productivity, entertainment, programming, and education.  All of them are directly available for download to your Apple II Pi (http://www.debian.org).  This spirit of openness is what Woz had in mind when he developed the Apple II in the first place.

How do I access my Apple II storage media (floppies, SCSI drive, CFFA, etc.)?

By leveraging the FUSE (File system in User SpacE) subsystem, all the ProDOS volumes can be mounted in your user directory.  The filenames are munged in a similar manner to the way CiderPress manipulates the names.  In addition, the raw devices are available for making full volume copies and usage with emulators.  Both floppy drives in slot 6 show up as raw devices regardless of the type of format so that emulators can access non-ProDOS formatted floppy disks.

What is the point of the Apple II Pi?

To be able to use Apple II hardware in a more modern environment.  Although it is possible to use the Apple II as a terminal to a Linux computer, it doesn’t provide much of a modern GUI environment or digital compatibility with flat panel monitor/TVs.  Just as GS/OS brought a functional 16-bit GUI to the Apple IIgs (with 8-bit compatibility for Apple II programs), Apple II Pi brings an up-to-date 32-bit GUI and OS to the Apple II (with 8-bit and 16-bit compatibility by way of the GSport emulator).

Additional information:  There are other projects that may also be of interest.  Ivan Drucker has bundled up David Schmidt’s ADTPro along with some other functionality in his A2CLOUD project:

http://appleii.ivanx.com/prnumber6/category/a2cloud/

http://adtpro.sourceforge.net

Using your Apple II as a Linux terminal:

http://www.tuaw.com/2007/07/15/turn-your-apple-iie-into-a-linux-terminal/

Apple II Pi Software – System Code

1.0 Introduction:

Apple II Pi is a combination of Apple II code, Linux code, and a serial port connection (either cable or optional plug-in card for the Apple IIe). It integrates the Apple II ProDOS world into the Raspbian Linux world of the Raspberry Pi, thus creating Apple II Pi.

The code repository is at GitHub. https://github.com/dschmenk/apple2pi

2.0 a2pid:

On the Linux side, the Apple II Pi daemon runs in the background, listening to the Apple II on a serial port connection, listening on TCP/IP port 6502 6551 (so as not to conflict with GSport on port 6502) for Linux client connections, and managing the insertion of Apple II keyboard and mouse events into the Linux input subsytem. It’s not something normally visisble, but is the traffic cop between the Apple II, Linux input events, and Linux client programs that interact with the Apple II.

2.1 Keyboard Mapping:

a2pid is responsible for mapping the ASCII characters from the Apple II keyboard into modern scancodes used by the Linux input subsystem. Because of the limited number of keys, the Open-Apple and Solid-Apple keys are used as modifiers to the other keys. Open-Apple is mapped to the ALT key. Solid-Apple is used as a FN modifier key: it alters the arrow keys to HOME, END, PGUP, and PGDN. It also converts the number ksys into F1-F10 equivalents. Solid-Apple+DELETE becomes DEL instead of BACKSPACE. Two special key sequences have a backdoor function for Apple II Pi.  Open-Apple+Solid-Apple+DELETE will exit the Apple II client code, returning keyboard control back to the Apple II. If you want to resume interaction with the Linux daemon, you can either press RESET, re-run the A2PI:STARTUP program, or reboot the A2PI floppy.

3.0 a2serclk:

a2serclk is the utility required when using the optional plug-in card for Apple II Pi. Otherwise, it isn’t needed.

3.0 a2serclk is deprecated – it has been integrated into a2pid.

4.0 A2PI.PO:

The ProDOS disk image file. Inside you will find ProDOS version 1.9, MERLIN8 version 2.59 assembler, BASIC.SYSTEM version 1.5, the STARTUP program that loads the A2PI device driver, and the CONFIG program to configure the slot connection to a2pid. A2PI.S is the source to the device driver developed using the MERLIN8 assembler. The device driver is loaded into the upper ProDOS BASIC buffer space so it won’t interfere with BASIC programs. However, leaving BASIC will disconnect the A2PI driver and keyboard/mouse operations won’t be seen in Linux until STARTUP is re-run from BASIC.

5.0 Conclusion:

The programs that make up the foundation of Apple II Pi should be hidden from sight and “just work”.

Apple II Pi Software – Utilities

1.0 Introduction:
This documents the utilities included in the Apple II Pi project. See the project README.md for installation instructions.

2.0 Contents:

Interactive tools

a2mon – Apple 1 like monitor
bintomon – Binary to monitor format converter
a2term – Apple II console

Development tools

bload – Load binary file
brun – Run binary file
a2lib.c – Simple a2pid connection library

Disk image tools

dskread – Read disk image
dskwrite – Write disk image

Supplemental files

a2slideshow.mon – Famous slideshow program in monitor format

a2slideshow.bin – Famous slideshow program binary

execfile – Sample exec file for a2term

Other files

a2pid – Apple II Pi Linux daemon

A2Pi.PO

3.0 Interactive Tools:

These tools are used to interact with the Apple II from the keyboard and screen. As real Linux tools, they can also accept I/O redirection to automate keyboard input and capture output. The other common ability (with the exception of bintomon) of the tools is to be able to connect to Apple II Pi remotely over the network. A final, optional argument is the IP address of the Apple II Pi computer. The tools can be built for a multitude of Linux and Unix computers and run remotely, connecting to the Apple II Pi.

3.1 a2mon:

The Apple 1 has a very simple monitor program that can examine and change memory, as well as execute code. a2mon is modeled after that monitor. As such, it isn’t very powerful, but can be a valuable tool when combined with I/O redirection. You can incorporate complete programs in the monitor format, or just change a few bytes of memory. Calling code in RAM or ROM is simple.

There is a concept of current address. To specify an address, just enter it first on the command line. To change memory contents, enter a colon either after a specific address or by it self to use the current address followed by the bytes separated by spaces. Reading a range of memory involves specifying two address separated by a period. To begin execution of code (run) at a specific address or current address, type ‘r’. Finally, ‘q’, will quit the session and return.

Run as:

a2mon [IP addr]

3.2 bintomon:


Converting a binary file to a monitor input format can be accomplished with bintomon. The command is run as:

bintomon  <filename> [IP addr]

standard output can be redirected to save the formatted text or piped into a2mon.

3.3 a2term:

Probably the most interesting of the tools, a2term connects the Linux console to the Apple II console. a2term connects to the Apple II running ProDOS BASIC. This is roughly equivalent to using an old serial terminal connected to a Super Serial Card and issuing commands to redirect the keyboard and screen I/O hooks.

AppleSoft programs, ProDOS commands, and Monitor commands are all available. Like a2mon, the input and output can be redirected to files for automated keyboard input and ouput capture. Similar to running the EXEC command from ProDOS (and DOS 3.3). To quit, use the ESC-Q sequence. To send an actual ESC character, press ESC twice. The DELETE key has been remapped to BACKSPACE for convenience.

There are some limitations that have to be followed. The screen editing/cursor movement keys are not available. As mentioned before, the DELETE key now backspaces to aid editing. Do NOT leave AppleSoft BASIC, or the mouse and keyboard will be disconnected from Apple II Pi and you will have to re-start BASIC.SYSTEM from the A2PI boot disk. If you run a program that doesn’t do any screen or keyboard I/O, you will see that your mouse and keyboard are no longer reponsive. Apple II Pi relies on the screen and keyboard I/O hooks to provide the co-operative tasking between Apple II programs and Pi input events. CTRL-C will usually break into an AppleSoft program (may take a few trys) but machine code that isn’t responding will require a press of RESET. Not to worry, Apple II Pi will resync and return to BASIC (assuming memory hasn’t been overwritten). In drastic cases, an Apple II reboot may be necessary. Apple II Pi will resync and you may continue on.

Run as:

a2term  [IP addr]

4.0 Development Tools:
Apple II Pi really shines as a development environment for the Apple II. To aid in the rapid development process, these tools were created to test binaries created in the Pi’s native environment on the actual Apple II.

4.1 bload:

bload will read a file from the Linux filesystem and copy it into the Apple II memory at the address specified. Apple II Pi incorporated a relatively fast communications channel so this operation is about as fast as reading from the floppy. Run as:

bload <filename> [IP addr]

Hexadecimal addresses are entered in ‘0x’ format otherwise decimal addresses are assumed.

4.2 brun:

Like bload, brun will load the binary file but will also jump to the loading address. Run as:

brun <filename> [IP addr]

4.3 a2lib.c:

All the tools include a2lib.c as a very poor, cheesy, horrible, etc. way to implement the Apple II Pi daemon API. Only useful if you are looking to write your own tool or modify the code of the existing tools.

5.0 Floppy Disk Image Tools:

Getting floppy disk image files to and from actual floppy drives has been greatly simplified with wonderful tools like ADTPro. For most sophisticated image transfer applications, use something like ADTPro. However, when something cheap, quick, and dirty will suffice, these two tools can make fast work of reading or writing disk images. Both of these tools only work on a 5 1/4 floppy  in drive 1 of slot 6. The only image format they support is the ProDOS order: .PO

5.1 dskread:

dskread will read the disk in the floppy drive and create a disk image using the volume name on the floppy for the filename. If the disk volume is HELLO, HELLO.PO is the name of the resulting disk image file. Run as:

dskread [IP addr]

5.2 dskwrite:

Simple, just like dskread. dskwrite is run as:

dskwrite <filename> [IP addr]

It will prompt you to overwrite the current volume name. ‘Y’ or ‘y’ will proceed and the floppy will be written.

6.0 Supplemtal Files:

Thes files are supplements to the tools to demonstrate their operation.

6.1 a2slideshow.mon:

Use with a2mon as:

a2mon < a2slideshow.mon

Press ESC to leave the slideshow. The slideshow is displayed on the Apple II screen, not the Pis’s screen.

6.2 a2slideshow.bin

Use with brun as:

brun a2slideshow.bin 0x2000

Press ESC to leave the slideshow. The slideshow is displayed on the Apple II screen, not the Pis’s screen.

6.3 execfile:

Use with a2term as:

a2term < execfile

Watch it automate AppleSoft.

7.0 Other Files:

These are the other files in the distribution.

7.1 a2serclk:

The Apple II Pi add-on card for the Apple IIe is a very minimal design that takes advantage of the built in General Purpose I/O (GPIO) pins of the Raspberry Pi. One of those pins is programmed by a2serclk to provide the clocking signal to the 6551 ACIA chip on the add-on card, thus saving a $2 crystal oscillator. Not needed if you are using an Apple //c or Super Serial Card in an Apple IIe to communicate to the Raspberry Pi.

7.2 a2pid:

The Linux daemon. See a2pid.txt.

7.3 A2PI.PO:

The Apple II client device driver and configuration utility.

8.0 Conclusion:

These tools are all very simple but adhere to the Unix principle of minimal funcionality with flexible I/O. They can be combined with shell scripts to create powerful commands. Feel free to add more.